Tampilkan postingan dengan label cheesecake. Tampilkan semua postingan

Canadian Cheese Stuffed Crescent Rolls


This is a sponsored post. I was fortunate enough to receive products and/or monetary compensation from Dairy Farmers of Canada. Though products were received, all opinions are my own and I would not recommend a product that I did not enjoy!
These Canadian cheese stuffed crescent rolls are best served hot/warm because melted cheese is always best in my opinion! Whether for a pre-Christmas dinner snack or New Year's party app, you will surely impress your guests with your #CanadianCheese!

Ingredients
  • 1 wedge Baluchon cheese , cut in half lengthwise so portion isn't so thick (save other half for another use.)
  • 1 wedge Boerenkaas cheese (trimmed so even in thickness.)
  • 2 packages original crescent rolls (mine are the 8-count size.)
  • Cucumbers, crackers, and other munchies for serving alongside cheese 🙂
Instructions
  1. Preheat oven to 375F.
  2. Open both containers of crescent rolls. Divide in half evenly so you have four sheets.
  3. Place two sheets of dough spaced apart on a baking sheet. Add cheese on top of dough. Cover cheese with remaining dough pieces, making sure to seal the edges the best you can.
  4. Pop into oven and bake for 20-25 minutes, or until golden brown and no raw dough appears.
  5. Serve immediately with cucumbers and crackers!

Perfect Pumpkin Pie


This Perfect Pumpkin Pie is in a word: delicious! A light and creamy filling that's beautifully spiced and just sweet enough, piled high with whipped cream!

Ingredients
  • One 9" frozen deep dish pie crust OR 1 refrigerated pie crust fitted in a deep dish pie plate
  • One 15oz can pumpkin puree (NOT pumpkin pie filling)
  • One 12oz can evaporated milk
  • 1 cup dark brown sugar (may substitute with light)
  • 2 large eggs
  • 2-3 tsp ground cinnamon (depending on how spiced you like it)
  • ½ tsp salt
  • ½ tsp ground ginger
  • ¼ tsp ground nutmeg
  • ⅛ tsp ground cloves
  • Fresh or prepared whipped cream or whipped topping
Instructions

  1. Preheat your oven to 425 degrees F. Place the prepared pie crust on a rimmed baking sheet in case any pie filling drips out during the baking process.
  2. In a large bowl, whisk together the pie ingredients until smooth and well combined, about 1 minute. Pour the filling into the prepared pie crust - crust will be VERY full. Loosely tent the pie crust edges with pie shields or foil.
  3. Bake for approximately 15 minutes at 425 degrees F, then lower the temperature to 350 degrees F and bake for approximately 50-60 minutes or until a toothpick inserted near the center comes out clean. Remove the pie to a wire rack to cool completely, then refrigerate for about 2 hours until firm. Serve with fresh or prepared whipped cream.

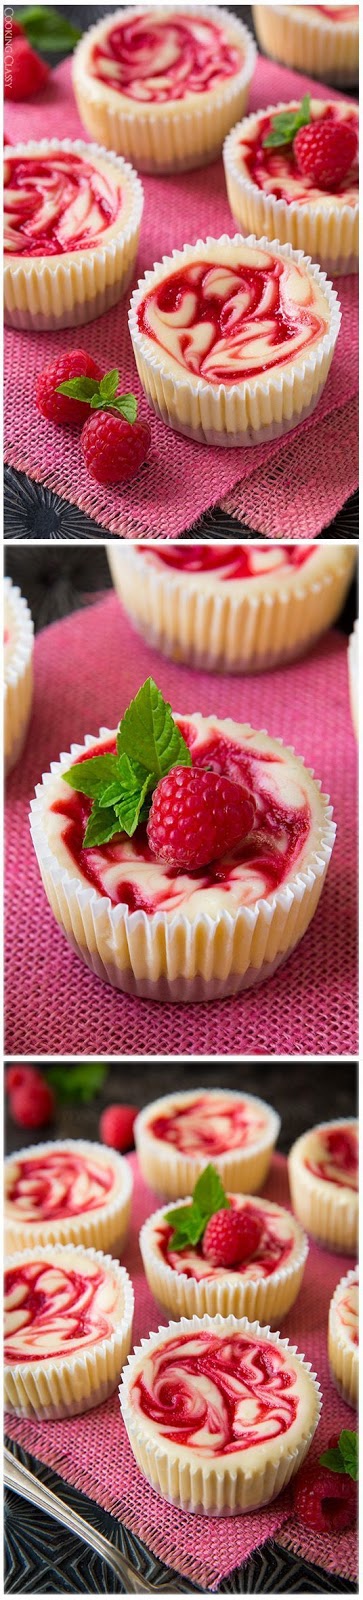
Raspberry Swirled Cheesecake Cupcakes


Cheesecake has got to be on my list of top 3 favorite desserts, which is why you see it on here quite a bit. You can never have too many cheesecake recipes and the options are seemingly endless (like when you walk into The Cheesecake Factory and take 10 minutes to choose because there are just so many options). One of my favorite ways to make cheesecake (ever since I made these Cheesecake Cupcakes with Salted Caramel Sauce or Strawberry Sauce) is in cupcake form. They are in individual servings, they're easier to serve and clean up, and they make for better portion control (maybe, you might just find yourself eating a few :).

This is a cheesecake combo you have to try! Raspberries and cheesecake were just meant to be together. You get this lightly crisp and crunchy graham cracker base topped with a silky smooth and deliciously creamy cheesecake filling which is then swirled with a fresh raspberry sauce. Heaven in dessert form right here! Try these and you'll understand why I'm completely in love with cheesecake.

Enjoy!

Ingredients
Crust
  • 3/4 cup + 2 Tbsp graham cracker crumbs (from 7 full sheets)
  • 1 1/2 tsp granulated sugar
  • 3 1 /2 Tbsp salted butter , melted
  • Raspberry Swirl
  • 4 oz fresh raspberries
  • 2 Tbsp granulated sugar
  • Cheesecake filling
  • 3/4 cup granulated sugar
  • 1 Tbsp all-purpose flour
  • 2 (8 oz) pkgs cream cheese, softened well but not melted
  • 1 tsp lemon zest
  • 2 large eggs
  • 1 tsp vanilla extract
  • 1/4 cup sour cream
Instructions

For the crust:
  1. Preheat oven to 325 degrees. In a mixing bowl, using a fork, stir together graham cracker crumbs and sugar, then pour in melted butter and stir until evenly moistened. Add 1 slightly heaping tablespoonful to 12 paper lined muffin cups. Press crust firmly into an even layer. Bake in preheated oven 5 minutes then remove from oven and allow to cool.
  2. For the raspberry swirl:
  3. Add raspberries and 2 Tbsp granulated sugar to a food processor and pulse until well pureed, about 30 seconds - 1 minute. Press mixture through a fine mesh strainer into a bowl (basically until there are only seeds remaining in strainer, you should get quite a bit out of it). Set aside.
  4. For the cheesecake filling:
  5. In a mixing bowl, whisk together granulated sugar and flour. Add cream cheese and lemon zest using an electric hand mixer, blend mixture just until smooth. Mix in eggs one at a time. Stir in vanilla and sour cream just until combined. Tap bowl forcefully against countertop, about 10 times, to release large air bubbles. Divide mixture evenly among cups over crust layer, adding about 1/3 cup to each and filling nearly full. Jiggle pan to level cheesecake filling then dollop about 5 small circle of raspberry sauce over each cupcake, about 3/4 tsp total over each one. Using a toothpick, swirl raspberry filling with cheesecake mixture to create a marbled design. Bake in preheated oven 22 - 25 minutes until cupcakes are puffed and nearly set (they might crack a little but they will deflate while cooling and you won't even see it). Remove from oven and allow to cool completely, then chill in refrigerator 3 hours, until set. Store in refrigerator in an airtight container.

Cookie Dough Cheesecake


Love cookie dough? This cheesecake is about to blow your mind.

INGREDIENTS
FOR THE CRUST
  • 1 package refrigerated chocolate chip cookie dough, divided
FOR THE CHEESECAKE
  • 4 8-oz. bars cream cheese, at room temperature
  • 1 1/4 c. sugar
  • 1/2 tsp. kosher salt
  • 1 tbsp. pure vanilla extract
  • 4 large eggs, at room temperature
  • 3/4 c. sour cream
  • 1/2 c. heavy cream
  • 3/4 c. mini chocolate chips, divided
FOR THE FROSTING
  • 4 oz. cream cheese, softened
  • 1/4 c. butter, softened
  • 1/4 c. powdered sugar
  • 2 tbsp. brown sugar
  • 1/2 tsp. pure vanilla extract
  • kosher salt
  • 1/4 c. mini chocolate chips
FOR DECORATING
  • 3 chocolate chip cookies, halved
  • 2 c. broken chocolate chip cookies
DIRECTIONS

  1. Preheat oven to 350° and wrap a 9" springform pan in foil.
  2. Make the crust: Pat 3/4 of the cookie dough log into the bottom of the prepared pan.
  3. Make the cheesecake: Bring a medium saucepan or teakettle full of water to a boil.
  4. In a large bowl using a hand mixer or in the bowl of a stand mixer using the whisk attachment, beat cream cheese on medium, scraping down the bowl as necessary, until completely smooth, 3 to 4 minutes. Add sugar and salt and beat, scraping down bowl as necessary, until smooth and fluffy, 3 to 4 minutes, then add vanilla and beat 30 seconds. Add eggs, one at a time, beating for 1 minute after each addition and scraping down the bowl as necessary. Add sour cream and heavy cream and beat on low until fully incorporated and completely smooth, about 1 minute.
  5. Pour about a third of the cheesecake batter into the cookie dough crust then sprinkle with about a third of the chocolate chips. Add another third of the batter, followed by another third of the chocolate chips. Add the rest of the batter, smooth the top of the cheesecake, and sprinkle with the rest of the chocolate chips. Roll remaining 1/4 of the cookie dough into tiny balls and drop on top of cheesecake.
  6. Place the cheesecake in a deep roasting pan and set on the middle rack of the oven. Carefully pour enough boiling water into the roasting pan to come about halfway up the sides of the springform pan.
  7. Bake until the top is just starting to brown and only the center is slightly jiggly, 1 hour 20 minutes. Turn off oven, prop open door with a wooden spoon, and let cheesecake slowly cool in its water bath for 1 hour.
  8. Remove roasting pan from oven, then carefully lift the springform pan out of the water and remove the foil. Set cheesecake on a rack and let come to room temperature. Once completely cool, loosely cover with plastic wrap and refrigerate until firm, 4 hours, or up to overnight. When ready to serve, carefully remove the sides of the springform pan.
  9. Make the frosting: In a large bowl using a hand mixer or in the bowl of a stand mixer using the whisk attachment, beat cream cheese, butter, powdered sugar, brown sugar, and vanilla. Season with salt and fold in mini chocolate chips.
  10. Dollop frosting on top of cheesecake. Top each frosting circle with half a cookie, then cover cheesecake sides with crushed cookies.

Source:delish.com

RED VELVET OREO CHEESECAKE COOKIES


You'll love putting these Red Velvet Oreo Cheesecake Cookies into your regular or Christmas baking routine.  They're a delicious moist, rich and white chocolatey cookie that delivers a wonderful mix of all your favorite flavors.

Ingredients

  • 1 box of Red Velvet Cake Mix
  • 1 stick of soften butter
  • 2 eggs
  • 10 crushed Oreo Cookies
  • 4 oz of soften cream cheese
  • 1 cup of white chocolate chips
Instructions
  1. Important tip: Once you've mixed your batter, you'll need to sit it in the fridge for about 30 minutes.
  2. In a large mixing bowl, mix your cake mix, soften butter, 2 eggs, soften cream cheese together.
  3. Then gently fold in your crushed Oreo cookies.
  4. I do save a few crumbs to place on top of the cookies
  5. Once everything is mixed together, cover your batter with plastic wrap & place in the fridge for about 30 minutes.
  6. Preheat your oven to 350*
  7. Using a cookie scoop, place your cookie dough on a baking sheet and bake for 10 minutes.
  8. Recipe will make about 2 dozen.
  9. Once your cookies have cooled, melt your white chocolate chips in the microwave in 20 second intervals. Stirring every 20 seconds. When your chocolate has melted, drizzle over your cookies as desired.

SWEET OATMEAL CREPES


The crepe recipe is the same as the Oatmeal Waffles but with more water, to thin the batter.  That being said, like the oatmeal waffles, they can be a little soft in the middle.  When cooking, make sure to press down on the done side to squeeze down the batter.  These crepes take much longer than flour crepes but are so worth it!

INGREDIENTS:
  • 2 cup rolled oats
  • 2 1/2 cups water (add more as it sits and thickens if needed)
  • 1 medium banana
  • 1 tbsp raw sugar, or other sweetener
  • 1/4 tsp salt
  • 1 tsp vanilla extract
  • Sprinkle or two of cinnamon (optional)
Filling
  • Sweet Cashew Cream mmm mmm mmm 
  • Sliced bananas
  • Chopped or sliced fresh berries of your choice
  • Chopped nuts of your choice (pecans are a great compliment)
  • Ground flax seeds (a small sprinkle)

INTRUCTIONS:
Topping

Berry Sauce
  1. Make the cashew cream and berry sauce before you make the crepes.  They chill in the fridge while you make the crepes. Be sure you have soaked your cashews for the cashew cream-read the recipe before you start!
  2. For the crepes, place all ingredients in a high speed blender and blend until smooth. Let stand a few minutes, if the batter becomes too thick, add enough additional water to make batter easily pourable and thin enough to make a thin crepe.
  3. Pour into a large skillet heated at medium heat.  Immediately rotate the pan around to spread the batter to the edges, making a thin crepe.
  4. Cook until the edges start to come up and it is easily flipped over.  Each side takes 3-5 minutes.  ~Tip~spray spatula with some cooking spray (or use water) on both sides and it won't stick to or rip the crepe when you flip it.)
  5. Once flipped over, periodically press down on it to spread it thinner and make it cook through.  Cook until it is well browned on each side, it will look like it is not fully cooked but that is ok it will dry out a bit in the oven and soft is good.  Store in the oven until you are ready to put them together.
  6. Chop the fruits and nuts.  Place one crepe on a serving plate, spread desired amount of cashew cream length wise down the crepe (like a burrito).  Top with chopped fruits, nuts, and sprinkle a small amount of flax on top of that.  Spread a thinner amount of cashew cream on top of it all so it will stick when you roll the crepe.
  7. Roll the crepe tightly and top the crepe with Berry Sauce and/or pure maple syrup then ENJOY!


GARLIC BUTTER PARMESAN SOFT PRETZEL BREADSTICKS


Get your soft pretzels fix in BREADSTICKS form! These easy soft pretzel breadsticks are covered in a flavorful garlic butter and tons of Parmesan cheese for the ultimate appetizer.

Ingredients
  • 1-1/2 teaspoons active dry yeast
  • 1-1/4 cups warm water 110F
  • 1 tablespoon coconut sugar or brown sugar
  • 1 teaspoon salt
  • 3 to 3-1/2 cups white whole wheat flour
  • 6 cups water
  • 4 teaspoons baking soda
Garlic Butter Topping:
  • 3 tablespoons butter
  • 3 cloves minced garlic
  • 2 tablespoons minced fresh parsley
  • 1/4 teaspoon salt
  • 1/3 cup grated Parmesan cheese
Instructions

  1. In the bowl of a stand mixer fitted with a dough hook attachment, dissolve yeast in warm water. Let stand 5 minutes until foamy, then whisk in sugar and salt. With mixer running on medium speed, add flour 1 cup at a time until dough pulls away from sides of bowl, adding additional flour if needed.
  2. Turn dough onto a floured surface and knead several times until smooth and elastic. Place in a greased bowl, turning once to grease top. Cover bowl with plastic wrap and let rise in a warm place, 1 hour or until doubled in size.
  3. Punch risen dough down and divide into 12 equal pieces. Shape each dough portion into a 6-in breadstick shape and place 1-apart on two parchment paper-lined baking sheets. Cover with plastic wrap and let rise 15-30 minutes.
  4. Make the garlic butter: In a small saucepan, melt butter over medium-high heat. Add garlic to pan and saute 1-2 minutes until garlic is fragrant. Remove from heat and stir in parsley and salt. Set aside.
  5. Meanwhile, in a large saucepan, bring 6 cups water to a low boil over medium-high heat. Dissolve baking soda into water. Working 1-2 at a time, carefully place breadsticks in boiling water and boil 30 seconds on each side, flipping once. Transfer back to baking sheets and repeat boiling with remaining breadsticks.
  6. Bake breadsticks in a preheated 450F oven 10 minutes, then remove from oven and brush with garlic butter and sprinkle with Parmesan. Return breadsticks to oven and continue baking an additional 5-10 minutes until breadsticks are a deep golden brown. Enjoy hot from the oven!

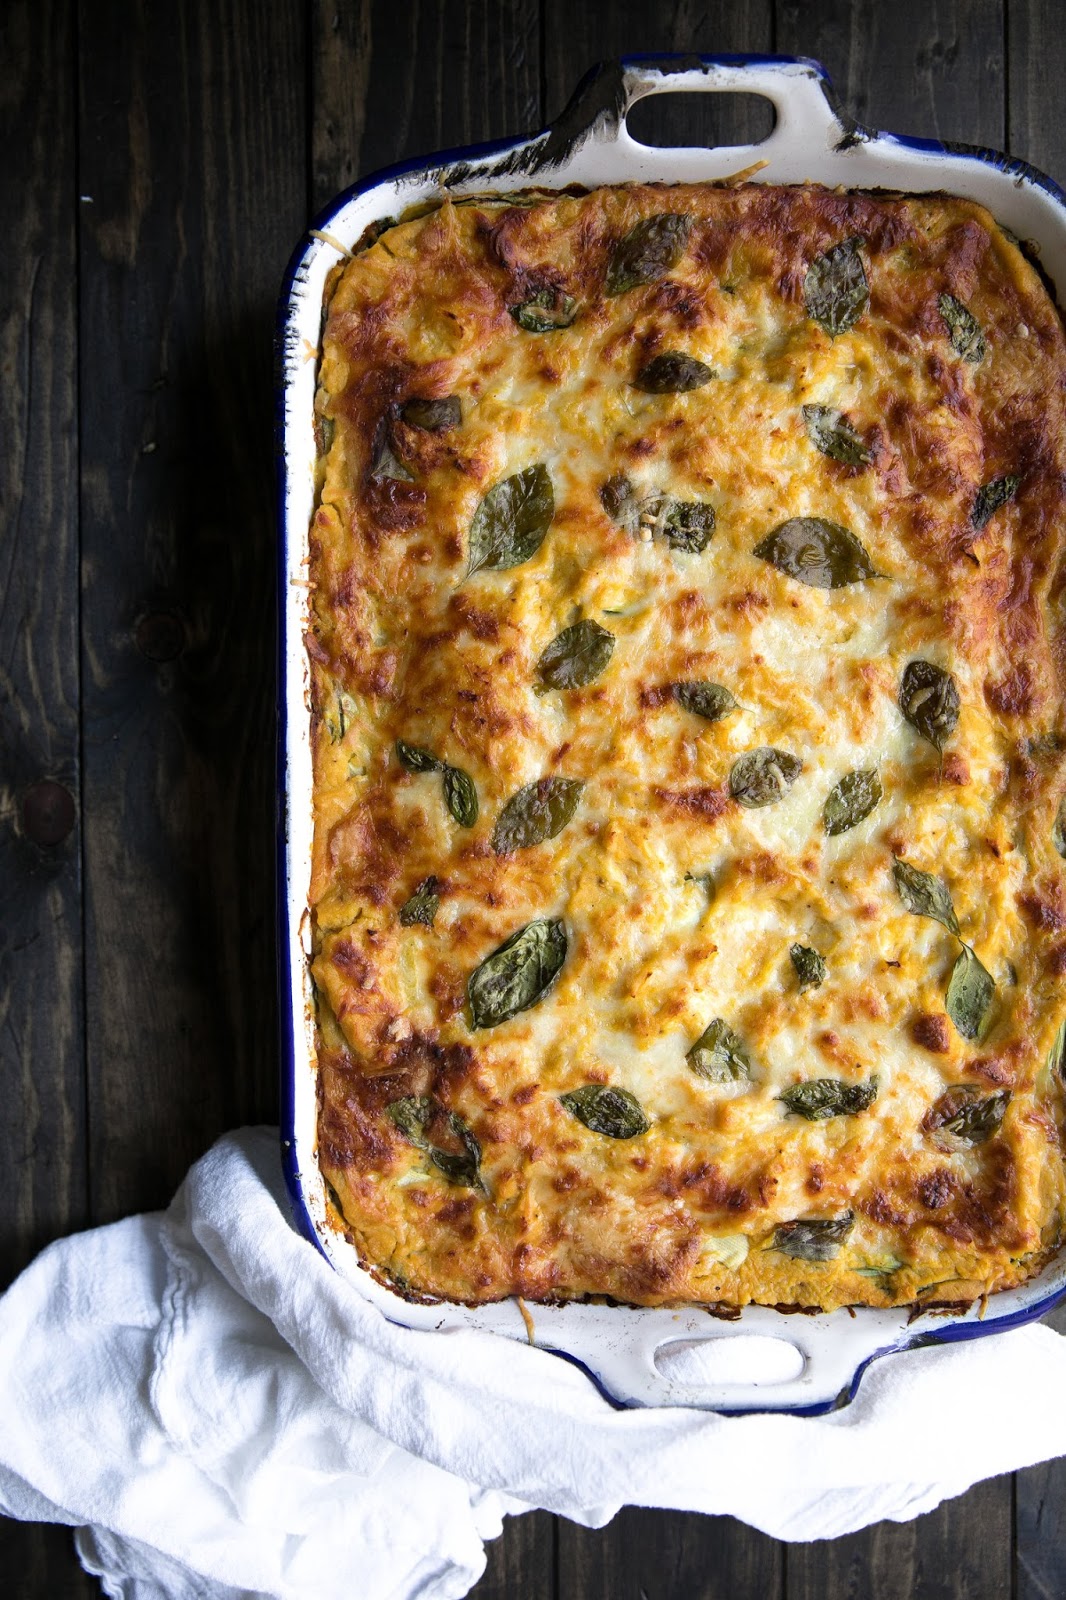
Butternut Squash, Zucchini and Spinach Lasagna


Butternut Squash, Spinach and Zucchini Lasagna. One of my most popular recipes, this delicious vegetarian recipe is rich, creamy and loved by even the pickiest of eaters!
It's made up of layers of spinach and pureed butternut squash sandwiched between pasta and zucchini noodles.  And cheese, there's lots and lots of cheese.

Ingredients
BUTTERNUT SQUASH FILLING
  • Butternut squash puree from 1 large or two small roasted butternut squash or 3 cans
  • 1.5 cups ricotta cheese
  • 5 cloves garlic, minced
  • 1/2 cups milk (more if needed)
  • 1/4 teaspoon salt (or more to taste)
  • 1/4 teaspoon nutmeg
Spinach Ricotta Filling
  • 3 16 ounce bags frozen spinach, thawed and squeezed of all extra water
  • 1.5 cups ricotta cheese
  • 1 cup mozzarella cheese
  • 1/4 cup chopped basil
  • 1/4 teaspoon salt
  • Pepper
Other
  • 3 medium zucchini sliced into 1/8" thick noodles (I used this)
  • 10-15 sheets no-boil lasagna noodles (or lasagna noodle of choice)
  • 2 cups shredded mozzarella cheese
  • 1/2 cup grated Parmesan cheese (for the top)
  • Fresh basil, for topping
Instructions

Preheat oven to 375 degrees F

FOR THE BUTTERNUT SQUASH FILLING
  1. Roast and puree your own butternut squash, (see how to here) or buy it canned from the market.  If neither are available to you, pureed pumpkin is another great option.
  2. Place the cooked (or canned) butternut squash, ricotta, garlic, milk, salt + pepper, and nutmeg in the bowl of a large food processor. Puree until completely smooth.  Add more milk if needed- you want the butternut squash filling to be thick and creamy, but not runny. Season to taste.
FOR THE SPINACH RICOTTA MIX
  1. Remove excess water from the thawed spinach; you can do this using a mesh wire strainer, cheesecloth, or tea cloth. Transfer the spinach to a large mixing bowl with the ricotta cheese, mozzarella, fresh chopped basil, salt and pepper.  Mix until fully combined. 
PUTTING IT TOGETHER

  1. Prepare your baking dish (I usually use a large, deep casserole dish, 12.38"L x 9.25"W x 2"H, but the one shown in the images is slightly larger).  Spray dish with non-stick cooking spray of choice.
  2. Spread 1/3 of the butternut squash filling on the bottom of the dish.  Sprinkle with a thin layer of mozzarella cheese and cover with a single, non-overlapping layer of no-boil lasagna noodles (approx. 5). Gently spread half the spinach mixture over the noodles and sprinkle with mozzarella cheese. Top with a layer of sliced zucchini*
  3. (REPEAT) Spread 1/3 of the butternut squash mixture over the sliced zucchini layer.  Sprinkle with a light layer of mozzarella cheese and top with a single, non-overlapping layer of no-boil lasagna noodles (approx. 5). Spread the second half of the spinach mixture on top of the lasagna noodles.  Top with mozzarella cheese and top with a layer of sliced zucchini.
  4. Spread the remaining 1/3 of the butternut squash filling over the zucchini and sprinkle with grated Parmesan and mozzarella cheese. Sprinkle fresh basil leaves on top of the cheese.
  5. Cover the baking dish with a large foil "tent" and bake for approximately 20-30 minutes. Remove the foil and continue to cook for an additional 15-20 minutes, or until the cheese is bubbly and golden.
  6. Top with additional fresh basil, if desired.
  7. Enjoy!